Payment Processor
Configure Payment Processor
jBilling can submit payments to virtually any payment gateway in the world. For this to happen, however, you need a payment processor plug-in that handles the payment requests to the gateway.
The following are configuration instructions for the plug-in that integrates with Intrannuity. The configuration for any other gateway is very similar, so you can use these instructions as an example
Payment Processor
Organization: Intrannuity, LLC
The Intrannuity payment plug-in can be used to securely process credit card transactions. To enable the plug-in, follow the steps below:
Merchant Account Request
Before you can process any transactions via plug-in, you must setup a merchant account with Intrannuity. Apply for the merchant account using this link: http://intrannuity.com/apply.html
Once your request is submitted, the Intrannuity staff will contact you and will guide you through the merchant signup process. Upon completion, you will be given a Merchant Account Code and Password necessary to configure the plug-in and to process credit cards.
Configuring Plug-In Within jBilling
The next step is to configure the plug-in. Log into jBilling:
- Select 'System' and then 'Plug-ins' in the main menu.
- Once the form appears, click on the link at the bottom that says 'Add a new Plug-in.' This will create a new row in addition to any already existing rows for plug-ins.
- In the new row created, select as type 'com.sapienter.jbilling.server.payment.tasks.PaymentAtlasTask.'
- Click on 'Add parameter' below the new task five times. Refer to Figure 1 below.
The following parameters must be setup:
1) merchant_account_code – value provided by Intrannuity
The merchant account code is used to track transactions associated with a specific merchant. This is a required field. Replace ‘parameter_name’ with ‘merchant_account_code’ and ‘default’ with the value provided by Intrannuity.
2) password – value provided by Intrannuity
The password is used in combination with the merchant account code to facilitate the authorization process. This is a required field. Replace ‘parameter_name’ with ‘password’ and default with the value provided by Intrannuity.
3) submit_avs –true/false
The parameter indicates whether you want track data and cvv2 values to be sent during the transaction authorization. These values are not required, but they are highly recommended to reduce the possibility of fraud and to lower your transaction processing fees. Replace ‘parameter_name’ with ‘submit_avs’ and ‘default’ with either ‘true’ (recommended) or ‘false’.
4) test – true/false
The test parameter indicates whether the transactions are processed via a real production server or via a staging server, which duplicates all functionality of the production server but doesn’t perform any charges. The test mode should be used for testing purposes only to ensure that everything is configured correctly before going live. For live transactions, this value should always be false. This field is required. Replace ‘parameter_name’ with test and ‘default’ with ‘true’ (test server) or ‘false’ ( production server).
5) timeout_sec
The 'timeout_sec' parameter indicates the time in millisecond before a transaction is timed out. Replace ‘parameter_name’ with 'timeout_sec' and ‘default’ with a value in milliseconds. This field is required. The recommended value is 180000 milliseconds (3 minutes).
Below is a sample test configuration:
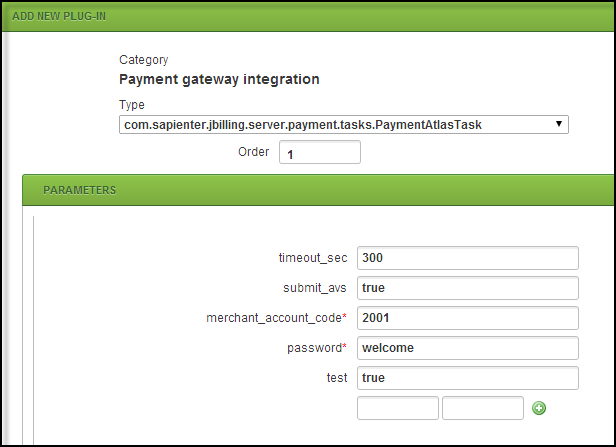
Fig 1: Plug-in
Remove Default Payment Processing Plug-In
Be sure to remove the task 'com.sapienter.jbilling.server.pluggableTask.PaymentFakeTask.' This is supplied as a default transaction processing plug-in which doesn’t actually process any charges.
Completion
You are now ready to use jBilling to process transactions with Intrannuity’s Payment Gateway. Additional fraud protection and transaction-validation filters can be configured for your account using Intrannuity’s gateway management portal.